


[ad_1]
Jenkins is a platform aimed toward making Steady Supply and Steady Integration not solely doable however a lot simpler. Learn how to put in it on Rocky Linux.

For any firm seeking to make agile growth a actuality, there are particular instruments you’ll need to make accessible in your groups. One such instrument is Jenkins, which helps greater than 1,000 plugins for the constructing, deploying and automating of agile tasks.
SEE: Hiring kit: Back-end Developer (TechRepublic Premium)
The important thing options of Jenkins embrace deployment-ready staging, extensibility, take a look at customization, third-party integrations, course of, workflow administration, configuration administration, reporting, entry management and automation.
On this tutorial, I’ll stroll you thru find out how to set up Jenkins on Rocky Linux 9. The set up is comparatively easy and shouldn’t take greater than 5 to 10 minutes.
What you’ll want to put in Jenkins
To comply with alongside, you’ll want a operating occasion of Rocky Linux 9 and a consumer with sudo privileges. That’s it.
Tips on how to set your time zone
The very first thing we need to do is be certain your Rocky Linux server is in the proper time zone. To test, log into your occasion of Rocky Linux and look at the record of time zones with this command:
timedatectl list-timezones
Now, discover your timezone on this record and set it with the next, the place TIMEZONE is the proper time zone in your space:
sudo timedatectl set-timezone TIMEZONE
Tips on how to set up the required dependencies
Subsequent, we’re going to put in the required dependencies. Begin by opening a terminal window and putting in Java OpenJDK with this command:
sudo dnf set up java-11-openjdk -y
Subsequent, set up wget and curl with this command:
sudo dnf set up wget curl -y
Tips on how to set up the Jenkins repository
We now want so as to add the official Jenkins repository with the next:
sudo wget -O /and so on/yum.repos.d/jenkins.repo https://pkg.jenkins.io/redhat-stable/jenkins.repo
Now, to import the Jenkins GPG key, use this:
sudo rpm --import
Tips on how to set up Jenkins
Now you can set up Jenkins with this command:
sudo dnf set up jenkins -y
When set up finishes, reload the systemctl daemon with this command:
sudo systemctl daemon-reload
Now, you can begin and allow the service with:
sudo systemctl allow --now jenkins
Should you’re not already permitting HTTP site visitors by the firewall, allow this now with the next instructions:
sudo firewall-cmd --add-service=http --permanentsudo firewall-cmd --reload
Tips on how to entry Jenkins
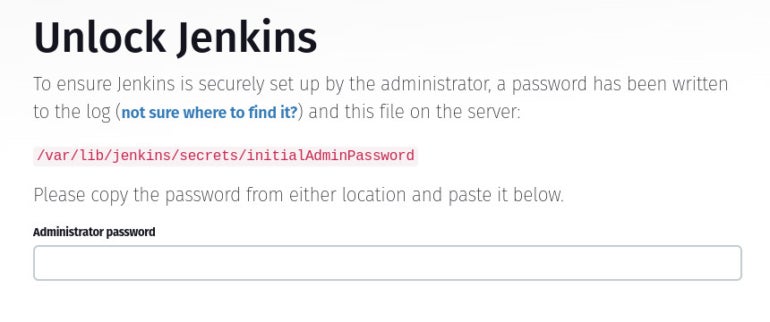
It’s time to entry the platform by pointing your internet browser to http://SERVER:8080, the place SERVER is the IP handle or area of the internet hosting server. You can be prompted to enter the admin password, which may be retrieved by operating this command:
sudo cat /var/lib/jenkins/secrets and techniques/initialAdminPassword
Now, copy and paste that password into the Administrator password subject (Determine A).
Determine A
You’ll then be prompted to put in plugins. I like to recommend you click on Set up Advised Plugins to get probably the most commonly-used plugins. After clicking Set up Advised Plugins, the set up will take a couple of minutes to finalize, however you’ll ultimately be prompted to create an admin consumer (Determine B).
Determine B

When you create the admin consumer, you’ll be introduced with the Jenkins principal web page, the place you can begin including your tasks.
Agility at your fingertips
Agile growth is difficult, so any instrument you may get to simplify the method ought to be a should in your developers. If you’d like agility at your fingertips, Jenkins is a superb place to start out.
Searching for extra ideas and tips for growth on Linux working programs? Take a look at our information, 8 must-have tools for developers on Linux.
[ad_2]
Source link
